Monday, September 30, 2013

Learn about Leaves Lesson

 What you need:

  • container
  • glue
  • posterboard
  • crayons 
  • paper

 What you do:

  1. Go outside and collect leaves together from trees, bushes, and flowers.
  2. Spread the leaves on a table and discuss the likes and differences and ask which one is their favorite and why. You can discuss different leaves colors and group them, but we live in Florida where everything is still green.
  3. Using glue, draw some lines on a poster board and have toddlers stick the leaves to the glue
  4. Have the children draw pictures of leaves. Try to draw the veins and stems of the leaves and find crayons that are a similar color.
  5. Hang up all artwork.


This project is a great way to get outside and run around, but it also teaches organization skills, same and different, realistic art, and observation.

Friday, September 27, 2013

Making Hand-Print Stepping Stones


These stepping stones capture their cute little hand-print so you can cherish it forever. They have a beautiful design on the back so you can keep them faced either way. This is a tricky project so follow the directions closely to avoid having to repurchase everything.

What you need:

  • Stepping stones ultimate package. 
  • Warm water


 It includes enough for 6 stepping stones, but I made it stretch further by using a quarter of the recommended amount.


Only make one stone at a time.  You can have the mix in both molds, but only add water to one.

What you do:


  1. Get a large glass of warm water and all materials set out and ready.  Any stamps, jewels, hands, wipes, etc need to be ready to use. Make sure any clothes the kids are wearing aren't important or have them in undies.
  2. Pour warm water into mix, stir, pour some more, and stir until it looks like pancake mix. Make sure you get all the dry spots from the bottom. They include a popscicle stick for stirring.
  3. Shake the mold to get air bubbles to rise up and pop.
  4. THE TRICKY PART:  You have to time the mix perfectly.  Too runny or dry and there won't be a handprint.  I tested it with a letter stamp.  If it was too soft I could stamp it again later. Do not test it with a handprint or fingerprint. 
  5. If the stamp took, then put on the jewels, make handprint, and stamp letters.  This is the order that I liked best because the jewels were ok in softer mix and the stamps did a little better in the harder mix, while the hand-print needed to be done during the sweet spot in between.
  6. Once everything is done with that stepping stone you can start the next one.
  7. After 5 hours I was able to pop both of them out of the molds beautifully. I went around the edges with a paring knife to make sure no sides were sticking. Then I pushed up the plastic bottom of the mold. They popped up. I wiped off any excess.  Then I let it finish drying on the fireplace mantle.


Thursday, September 19, 2013

How NutriBullet Outperforms Vitamix

I owned a Vitamix for almost two years. So when it started leaking on the bottom and getting mildew, I couldn't exchange it or get a refund because the warranty only lasts a year.  I loved the Vitamix because it was the first blender that would actually cut through seeds. I was actually able to drink fruit smoothies instead of eat them.  I didn't have to peel an apple. It was the first time I had a lot of different fruits in a smoothie. It was a revelation. I thought I would replace the Vitamix with a new one but I couldn't get over the fear of spending $400 to $500 a year on a Vitamix every time the warranty was up and it broke.  I replaced it with the cheaper $99 ninja which is such a joke and I do not know how it can even show a picture of smoothies on the box.  I think I could use a fruit muddler with better results.  I defended the Vitamix as the reigning blending champion.


Then I got the NutriBullet.  Even if you have $500 to spend on a blender, I would still say to get the NutriBullet instead.

Here are 12 reasons why the NutriBullet beats the Vitamix.

  1. It's cheaper. I got the NutriBullet system at Wal-mart for $99, not $500 like the Vitamix. It comes with a standard 1 year warranty too.  You can also get a 3 year Walmart warranty for $9.
  2. It blends just as well as Vitamix, if not better, and does it faster. It does this without the use of the giant stick that comes with the Vitamix.  Look up videos of people making smoothies with each blender on youtube and see for yourself the time difference.
  3. The container is smaller.  I would always make entire pitchers of smoothies with the Vitamix when I really just wanted one cup.  The pitcher is so big that I could never make a dip size dish of hummus or pesto.  I wasted so much food by using that big container.
  4. There are no buttons. When I started using the Vitamix it burnt out and I had to wait 45 minutes to reuse it. That is because the rules of the Vitamix are to start at a low number and then work it up to a higher number.  With the NutriBullet, there are no numbers or dials or buttons.  When you turn the container, it turns on.  You can't mess it up. 
  5. The base is smaller.  The Vitamix is pretty wide and needed a good area of counter space, not as much as a toaster oven, but too much to leave it out all the time.  The NutriBullet is so much skinnier that I can leave it out even on a crowded counter.
  6. NutriBullet is easier to clean well.  The Vitamix is supposed to be easier to clean because there are no parts to disassemble, but you are either spraying the blade from the top of the pitcher or you are filling the pitcher up with water to blend again to clean it.  I like the NutriBullet better because I can screw the base off and spray water directly on the blade. If I am making a smoothie after the kids are in bed, I don't have to run the blender again to wash it.  Also on the Vitamix, there is this impossible space to clean between the bottom of the pitcher and the spinning bottom piece. Because my Vitamix leaked, it was always dirty there.
  7. NutriBullet is quieter.  They may be at the same noise level when Vitamix is set to a 1 or a 2 but the NutriBullet is still breaking seeds and apple peel without the loud noise of a Vitamix set on higher numbers.
  8. Smoothies are colder and a better consistency.  The Vitamix can heat up so hot that it cooks foods, like steaming hot custard.  The ice in my smoothies often melted before all the seeds were broken up. I was adding more ice and getting a watery smoothie when I just wanted a frozen smoothie. The NutriBullet makes smoothies perfect. I have never needed to add more frozen fruit or ice. 
  9. Lids and cups.  I love that the NutriBullet comes with lids and additional cups.  If I want to make a pineapple smoothie but hubby wants a peanut butter milkshake, I don't have to rush to give up the blending container. In fact I can even choose not to finish my smoothie in the blending container and top it with a lid and put it in the fridge for later.  He can use one of the other two blending cups. This is great for families rushing in the morning to make their personal smoothies. There is no clean time in between using the blender containers.
  10. Comes with two blades. The NutriBullet comes with a milling blade and a regular blade. You do not have to purchase it separately like you have to with the Vitamix.  With this blade you can make flour and nut butters.
  11. Removable blade.  If I make a recipe, like homemade larabars, I like the toddlers to be able to reach their hands in the container and make balls out of it.  They can take a part in making the food.  Since the blade is not removable with the Vitamix you have to scoop out the mixture into another container and dirty another dish.
  12. Emptying the container.  The Vitamix container is for pouring out, not for drinking out of like the Nutribullet. The Nutribullet has handles that you can add to the blending container to use like a mug.  When you pour a smoothie out of a Vitamix, you have to be careful that it does not all plop out at the same time and spill over your cup onto the counter. The opposite can happen also, where you need a spatula to scrape out the contents.  Your hand will get smoothie all over it because it will be wiping along the sides of the container as you scrape. None of this happens with the NutriBullet.
I know people who spent half a grand are going to defend the Vitamix to their grave, but honestly I have owned both and I admit that I was a sucker for paying that much for a blender.  Just accept the mistake and move on.  If someone's cheaper blender is outperforming your $500 blender, it's OK to accept defeat.

Tuesday, September 17, 2013

2 ways to have pizza in under 30 minutes

Here are two cheap ways to have pizza faster than delivery.


 Option 1:Make a no-rise pizza dough from scratch.
What you need:

 Crust:
2 cups all-purpose flour (you will probably use about 1/4 c.while kneading it and to dust your hands and counter with as well)
1 envelope Fleischmann's Pizza Crust Yeast
1-1/2 teaspoons sugar
3/4 teaspoon salt
2/3 cup very warm water 
3 tablespoons olive oil

sauce and toppings

What you do: 
  1. Mix 1 cup of flour and all of the other crust ingredients in a mixer like a kitchen-aid, using a dough hook.  Add more flour until the dough forms a ball and is not too sticky or too hard.  Mix for about 1-2 minutes.  You do not have to wait for yeast to proof or dough to rise in this recipe.
  2. Roll dough out with a rolling pin.  I like it super thin because you get more pizza for less carbs, and because I dream about the pizza Elizabeth ate in the book "Eat, Pray, Love".
  3. Top with sauce and toppings and bake at 425 degrees for 15-20 mins.


Option 2: Use pre-made personal pizza crusts (2 for $1 at Dollar Tree)


What you need: 

pre-made crusts, sauce, toppings

What you do:

  1. Pre-heat oven to 425 degrees
  2. Add sauce and toppings.
  3. Cook for 8-10 minutes

MAKE IT HEALTHY:  
  1. Use chunky garden spaghetti sauce instead of pizza sauce.
  2. Add veggies as a topping (even spinach), creating pictures on your pizza can inspire kids to use more colors aka veggies.
  3. Puree veggies and add to sauce.


Friday, September 13, 2013

Best Homemade Playdough

This playdough is soft but not sticky.  It is easy to add food coloring or extracts for scents without getting mushy.

What you need:

1 cup flour
1/2 cup salt
1 cup water
2 tsp cream of tarter
1 tbs cooking oil
food extracts
food coloring

What you do:

Toss all ingredients (minus food coloring) into a small pot and cook on medium stirring constantly. Once it forms a ball and looks like the consistency of playdough then remove it from pan. It should be playdough consistency, not sticky like bread dough.  This way you can add food coloring without it getting too sticky and messy.


Take the dough ball out of the pan and knead out any remaining lumps.
 

Divide into balls depending on how many colors you want.  Press your thumb into each ball to make a reservoir to put food coloring in.

Then you can kneed each ball to spread the color evenly.  You may want to wear gloves for this part.  Once the colors are blended in, they will not stain hands and they are ready to hand over to the kids.


You can play with the playdough with items like a pizza cutter (plastic), rolling pin, stamps, fruit muddler, slotted spoon, butter knife, crafts sticks, and more. :)


Store in sealed containers or plastic bags.

Tuesday, September 10, 2013

Footprint Ghosts


What you need:
  1. Black and white paint (use-non-toxic)
  2. Paintbrush
  3. Googly eyes
  4. Letter Stamps (optional)
  5. Wipes and Paper Plate (for easy cleanup)
  6. Foam sheets or construction paper (your color of choice)

 What you do:

  1. Paint the bottom of child's foot with white paint
  2. Press foot onto foam paper, then immediately wipe paint off
  3. Stick googly eyes to wet paint
  4. Paint a black mouth (the white paint did not have to dry first)
  5. Dip letter stamps into your choice of paint and spell words like "BOO!" "HAPPY HALLOWEEN!" "TRICK OR TREAT, SMELL MY FEET"
Tips: If you use dark paper, your paint color for words will be light and vice versa.

These are so cute and can be framed, or hung on doorway for Halloween.  Put these in a portfolio or binder after the holidays to look back at how small their feet once were.


Frugal Find: 101 cookie cutters $10, plus 16 ways to use them!


Wilton's 101 cookie cutter set is $10 at Wal-Mart.

I have a lot of ideas for these:
  • Cookies
  • Jello
  • Ornaments
  • Sandwiches
  • Stamps
  • Holiday Decorations
  • Outlines for ABC's and 123's for toddlers to color in or paint
  • Sand sculptures
  • Bento Box creations
  • Playdough
  • Moon Sand
  • Biscuits
  • Rice krispies treats
  • Fudge cut outs
  • Beginner sewing outlines and cut-outs
  • Create letter and numbers blocks with air dry molding clay, then paint

Monday, September 9, 2013

Best Banana Bread Recipe

I bought 40 bunches of bananas for $8 at the Farmer's Market, so expect a few more banana recipes coming up. I like how simple and minimal the ingredients in this are. This banana bread has an extremely moist center with a crisp outer. It only lasted a few hours in our home.


What you need:

  • 1/2 cup butter
  • 1 cup sugar
  • 2 eggs, beaten
  • 4 bananas
  • 1 1/2 cups flour
  • 1 teaspoon baking soda
  • 1/2 teaspoon salt
  • 1/2 teaspoon vanilla
What you Do:

  1. Cream together butter and sugar.
  2. Add eggs and bananas
  3. Sift together flour, baking soda and salt. (I let the toddlers stir dry ingredients) 
  4. Add to creamed mixture. Add vanilla.
  5. Pour into greased loaf pan.
  6. Bake at 350 degrees for 60 minutes.
I want to make this a healthier recipe, by subbing White Wheat Flour, but this was so perfect that I know I won't change a thing.

Fruit Kebabs: The Favorite Party Food

 For some reason, if I put fruit in a bowl, it's untouched. But if I put fruit on a kebab, it's the first item to run out.  As people walk in the door they go straight for the kebabs, every time, every party.  It's magical.
 This time I got Sebastian involved. I thought the sharp edge on the skewer would be too dangerous for him but he never poked himself.  I tried to teach patterns but he just wanted to stick fruit on a stick.  We will get to fruit kebab patterns eventually.

8 Toddler Chores to get them Excited About Cleaning

Most of these chores are not actually going to get things very clean. But if you are looking for an activity that is free and teaches responsibility, then here are some ideas that my toddlers liked and why they liked them. 

 1 Vacuuming:

  • It lights up.
  • It shows how strong he is. 
  • It sounds like a dinosaur.

2  Swiffer Dusting:

  • It extends to different lengths.
  • It looks like a weapon.
  • It makes loud noises when hit against something.

 3 Swiffer Mopping:

  • There is a button on it.
  • It sprays.
  • It is light enough for a toddler to move.

 4 Washing Windows:

  • Mom uses a spray bottle.
  • That's it, anything that sprays is awesome, but you can tell them to wipe it more and you will spray it again for them.

5 Putting Toys Away:
  • It's  fun if it's a race.


6 Emptying the Dryer:
  • The clothes are warm.
  • He likes to check if it smells "nice and clean". He will even check the boxers....
  • They like to see who can grab more.


7 Moving the laundry basket:
  • If it's heavy then he accepts the challenge.


8 Taking trash to the garage door:
  • If it's big, then it looks like it's heavy.  Carrying a garbage bag full of paper towels and tissue paper made her feel as big as her brother.


Tips for Painting Toddlers Nails


  1. Be in a comfy spot.
  2. Have all the materials needed for nails: nail polish, top coat, napkin, etc.
  3. Have many things to keep toddler distracted: tablet, TV, books, food, etc.
  4. Use a quick drying polish.
  5. Enjoy the bonding time. Don't get upset if it looks like abstract art. Anything paint on the skin will wash off after one long bath.

Toddler with a Knife

I let the toddlers start using knives pretty young.  I suggest starting with those cheese knives that have adorable characters on the end that are easy to hold on to.

They are small and lightweight knives that are perfect for cutting soft things like fruit and cheese.  Around the age of 2, I let them use a butter knife. This is a great activity if you are trying to make dinner. They can eat the food they cut, keeping them from getting cranky hungry and away from a hot oven.

Friday, September 6, 2013

Cracking and Cooking Eggs: Toddler Style

Don't Have Time to Think About it Art Activity

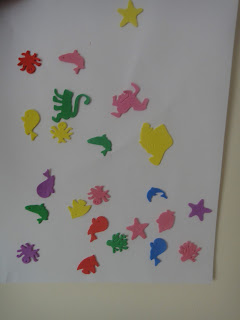
Stickers and paper.  The go-to art activity when you don't have time to think of an art activity.  Sebastian enjoys putting the stickers on and Genevieve loves pulling them off. $1 for a pack of foam stickers at Dollar Tree.

Candy Engineering: Marshmallows

 What you need:


  • Marshmallows (refridgerated works better)
  • Toothpicks

What you do:

  1. Connect marshmallows and toothpicks to create 2-D and 3-D structures.


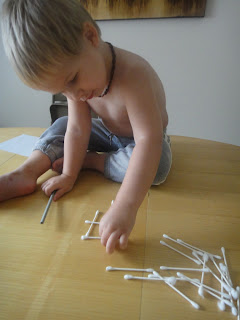
Q-Tip Art: Very Cheap Activity

 What you need:

Q-Tips


What you do:

Create houses, windows, shapes, dinosaurs, railroad tracks, roads, faces, etc.

As you can easily see, he made a house with windows. ;)  He likes that windows have a criss-cross pattern.

20 Music Stations for Toddlers on Pandora: FREE

I LOVE Pandora's music! It's free, it accesses new music constantly, and I don't have to find each song individually and add it to a playlist. I play Pandora during most of the arts, crafts, and games with the toddlers.


Here are some toddler friendly Pandora Genre's:
  1. Toddler
  2. Lullaby
  3. Radio for Kids
  4. Children's Indie
  5. Family Road Trip
  6. Family Folk Song
  7. Christmas
  8. Halloween Party
  9. Classical for Studying

Here are some Artists and Tracks to type in:
  1. Barney and Friends
  2. Elmo
  3. Disney (Children's)
  4. 52 Sing-a-long silly songs
  5. Nursery Rhyme Medley
  6. Veggie Tales
  7. Karma Kid's Yoga
  8. Kidz Bop Kids
  9. Baby Einstein (Children's)
  10. Rockabye Baby! (Children's)
  11. Children's Instrumental Ensemble (Children's)

Canvas Painting

 What you need:


  • Paints (you can mix up acrylic, oil, finger paint, fabric paint, etc)
  • Plate
  • Brushes
  • Canvas

 What you do:


  1. Squirt paints on a plate and let toddler go at it.
  2. Hang artwork on wall.

 How to clean up:


  1. Wipe toddler down with baby wipes or stop by sink for a wipe down.
  2. Throw all brushes and paint plate in a sink with hot soapy water.
  3. Spray table/painting area with a cleaner and let sit for 10 mins.
  4. Come back with paper towel and wipe up.
  5. Come back and rinse brushes after an hour.


This seems like a messy activity but it is actually one of the easier ones for me to clean up. It is mostly a matter of soaking, but no scrubbing. Food messes are the real troublemaker.